Install Istio and Kiali on IBM Cloud or Minikube

I recently started to look into Istio and Kiali.

Istio is an open-source service mesh that sits on top of Kubernetes. It provides functions for traffic control, fault tolerance, logging and monitoring, and security. It has started as joint project by IBM, Google, and Lyft. Kiali is an Istio dashboard and in my opinion Istio is only half the fun without Kiali.

In order to explore Istio you need a Kubernetes Cluster. I have tested two options:

  1. IBM Kubernetes Service on IBM Cloud. There is a free (“lite”) cluster that you can use for 21 days.
  2. Minikube. If you have a reasonably sized notebook, Minikube is great, too.

IBM Kubernetes Service

You can create a free Kubernetes cluster (single node, 2 CPUs, 4 GB memory) that will be active for 21 days, after this time it will be deleted. Although the cluster is free, you still need an IBM Cloud account where you entered a credit card.

To create a Kubernetes cluster, select “Kubernetes” from the burger menu in the upper left corner of the IBM Cloud dashboard.

Create a free Kubernetes cluster on the IBM Cloud

In the “Kubernetes” dashboard, select “Clusters” on the left, then click on “Create cluster.” Select “Free” (1), a location (2), give your cluster a name (3) and click “Create cluster”. Creation takes about 15 to 20 minutes.

Once the cluster is deployed and in status “Normal”, go to the “Add-ons” tab.

Kubernetes Add-Ons on IBM Cloud

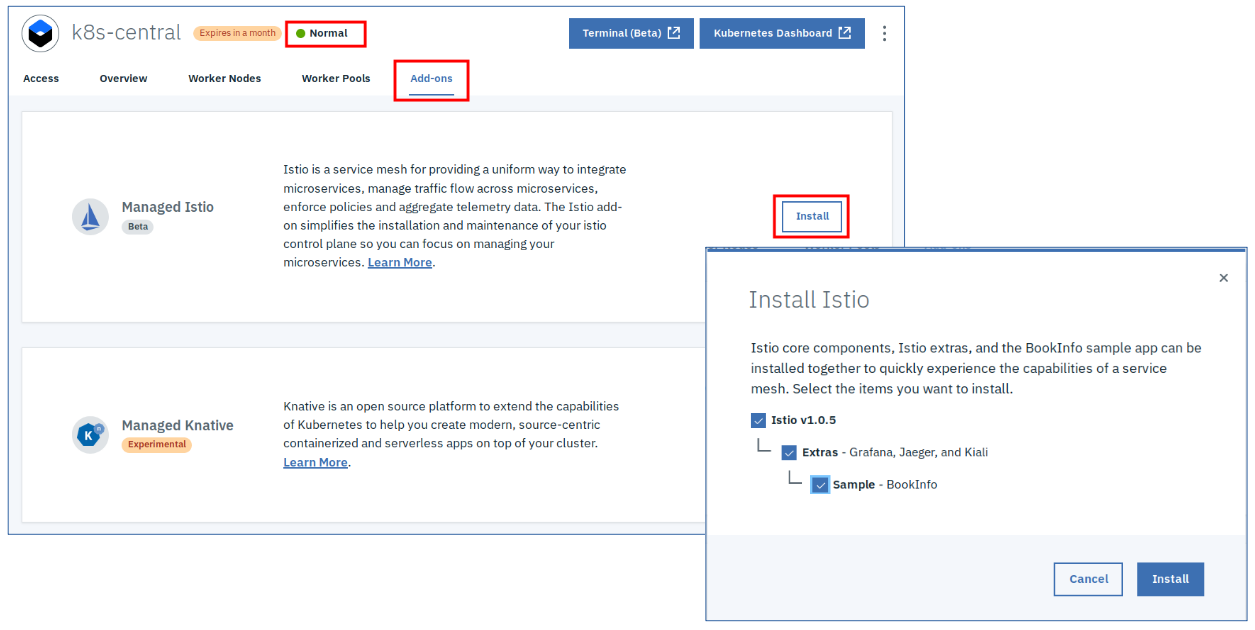
Click “Install” for Managed Istio, then select “Istio”, “Extras”, and “Sample”. This is so cool: 5 clicks and you have a managed Istio, with Grafana, Jaeger, and Kiali, and the Istio Bookinfo sample to start with.

Gaining access to the Kubernetes cluster is described in the “Acccess” tab of the cluster dashboard:

Basically you need the “ibmcloud” CLI, login to you IBM Cloud account, target the region where you cluster is located, and download the Kubernetes configuration file. The instruction in the dashboard and at the end of the download specify an “export” string that you need to paste into the command shell. After that, kubectl will target the cluster in IBM Kubernetes Service. In addition there is a button in the cluster dashboard that opens the “Kubernetes Dashboard”.

Access to Kiali requires a port-forward, the URL for Kiali then is http://localhost:20001

kubectl -n istio-system port-forward $(kubectl -n istio-system get pod -l app=kiali -o jstadata.name}') 20001:20001

If you installed the Bookinfo sample, this is how you can find the public IP address of the worker node:

ibmcloud ks workers <cluster name> 
kubectl -n istio-system get service istio-ingressgateway -o jsonpath='{.spec.ports[?(@.name=="http2")].nodePort}' 

gives the port number of the istio-ingress-gateway, typically 31380.

Bookinfo productpage is then available at http://publicIP:31380/productpage

Istio Bookinfo Sample

Minikube

Installation instructions for Minikube can be found here. I run it on Linux (Fedora 29) with VirtualBox (Version 5.2.26) as Hypervisor. It starts with a default of 2 CPUs, 2 GB of RAM, and 20 GB diskspace for the Virtual Machine in VirtualBox. This is not sufficient for Istio, I was able to run it on 4 GB of RAM, but the more CPU and memory are available for it, the better it performs.

You can set the configuration for Minikube with these commands before starting it for the first time:

minikube config set cpus 4
minikube config set memory 8192
minikube config set disk-size 50g
minikube addons enable ingress 
minikube start

This starts Minikube with 4 CPUs, 8 GB of memory, a 50 GB virtual disk (VirtualBox uses thin provisioning, it doesn’t really use 50 GB of disk space unless the virtual disk really fills up), and it enables Kubernetes Ingress. Starting Minikube can take 15 to 20 minutes for the first start.

“minikube dashboard” will then open the Kubernetes dashboard, “minikube stop” stops the cluster, “minikube start” restarts the existing cluster, and “minikube delete” deletes the cluster (in case you want to start fresh or get rid of it).

The fastest method to install Istio on Minikube is this:

curl -L https://git.io/getLatestIstio | sh -

This will download Istio into a directory “istio-1.0.6” (at the time when I wrote this blog) and will instruct you to add a directory to your PATH variable so that you can use “istioctl”, its CLI. Change into the istio-1.x.x directory and install some custom resource definitions:

kubectl apply -f install/kubernetes/helm/istio/templates/crds.yaml

Once this is complete, install Istio itself:

kubectl apply -f install/kubernetes/istio-demo.yaml

Once the installation has completed, check the status of the Istio pods:

kubectl get pod -n istio-system

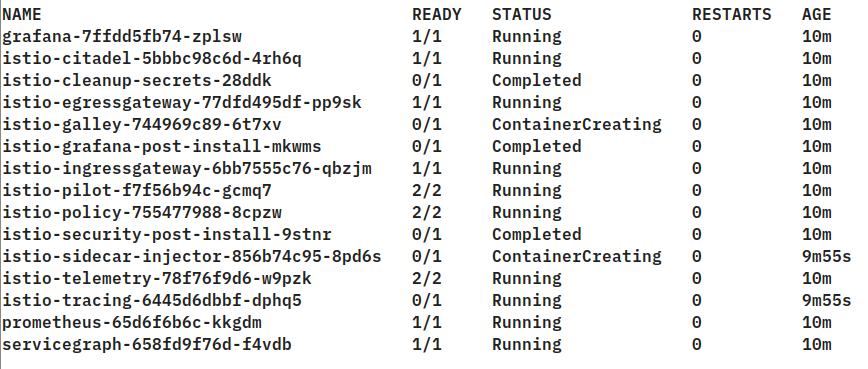
All pods must be in status Running (2/2) or Completed (0/1). Then install Kiali

bash <(curl -L http://git.io/getLatestKialiKubernetes)

You are asked for a Kiali admin userid and password. Once installation is complete, check if the Kiali pod is ready (“kubectl get pod -n istio-system”). Once it is ready, look at its log:

kubectl log kiali-xxxx-xxxx -n istio-system

It should look similar to this:

I0208 05:56:09.375998       1 update_base_url.go:13] Updating base URL in index.html with [/kiali]
I0208 05:56:09.376658 1 javascript_config.go:13] Generating env.js from config
I0208 05:56:09.379867 1 server.go:44] Server endpoint will start at [:20001/kiali]
I0208 05:56:09.379884 1 server.go:45] Server endpoint will serve static content from [/opt/kiali/console]
I0208 05:56:09.380503 1 server.go:50] Server endpoint will require https

This means that Kiali is listening on URI /kiali on https. It is configured to use a NodePort:

kubectl get svc -n istio-system

The Kiali entry looks like this:

kiali NodePort 10.103.75.235  20001:31993/TCP

The Minikube IP address can be found with

minikube ip

In my environment it is 192.168.99.100.

So the Kiali Dashboard can be accessed at https://192.168.99.100:31993/kiali Accessing the Dashboard requires to accept a security exception since it uses a self-signed TLS certificate!

Kiali Dashboard

Install the Bookinfo sample, you need to be inside the istio-1.x.x directory:

kubectl create namespace bookinfo
kubectl apply -n bookinfo -f <(istioctl kube-inject -f  samples/bookinfo/platform/kube/bookinfo.yaml)

Once the Bookinfo pods are available (“kubectl get pods -n bookinfo”), create an istio-ingressgateway to access the Bookinfo productpage:

kubectl apply -n bookinfo -f samples/bookinfo/networking/bookinfo-gateway.yaml

The Bookinfo productpage is then at http://minikubeIP.31380/productpage

Blue Cloud Mirror — (Don’t) Open The Doors!

This isn’t specific to our game “Blue Cloud Mirror”. Everyone trying to create a Hybrid Cloud will need to decide how to connect a local application in a secure manner with code running on the Cloud without fully opening “the doors”. IBM offers a service called Secure Gateway exactly for this purpose. It creates a TLS encrypted tunnel (TLS v1.2) between a Secure Gateway Server on the IBM Cloud and a Secure Gateway Client installed on-premise in your private network. The connection is initiated from the Client so there shouldn’t be any issues with your firewall.

IBM Secure Gateway

You can test a limited (“lite”) version of IBM Secure Gateway with a free IBM Cloud account. Limited means you can connect to one destination which is one on-premise application with a limited amount of traffic (500 MB/month), sufficient for our needs with Blue Cloud Mirror.

The IBM Secure Gateway Service can be found in the “Integration” section of the IBM Cloud Catalog. Log on to the IBM Cloud, go to the Catalog, select IBM Secure Gateway, choose a region, an organization, and a space, click “Create” and wait a moment until the service is ready.

I wrote about the configuration of IBM Secure Gateway in the Users section of our Github repository. There are two things that may be confusing when you start to configure:

  1. What is the difference between Client and Destination?

The Secure Gateway Client is a piece of software that is installed on a server (physical or virtual) on-premise in your data center. It creates the connection to the IBM Secure Gateway service running on the IBM Cloud.

The Destination is the application or API that you want to connect to. It could run on the same server as the client or it could run somewhere on the same network within the data center.

2. Why do I need to configure ACLs, too?

I already specified the destination address and port in the destination configuration. And then I need to specifically allow access to the address and port in the ACL (access control list), too. The ACL is a list that contains information about all clients and their destinations that you manage with an IBM Secure Gateway instance. With the ACL you can “turn off” (deny access) to a destination without deleting it. Maybe you are about to install a new version of the application/API.

At the end of my last blog “Blue Cloud Mirror – Of Kubes and Couches” I explained that access to the Users API is via a Kubernetes ingress which is configured for a host “users-api.cloud” and secured with a self-signed TLS certificate. Both, the host name and the self-signed certificate would be a problem if I tried to access the API via the Internet directly. With Secure Gateway this is not an issue. In the README I give instructions how to create the TLS certificate and how to add the Ingress (Minikube) IP Address together with the hostname “users-api.cloud” to the servers hosts file so that the Secure Gateway client can resolve it: The hostname and TLS certificate are used in the Secure Gateway destination configuration.

If you go through the configuration yourself you’ll notice that the Secure Gateway Client is available as a Docker image, too. I tried to use that and even tried to create a Kubernetes deployment from it. The problem is that you can’t easily change the hosts file of the Docker image and without adding the hostname “users-api.cloud” the Secure Gateway Client isn’t able to resolve the IP address of the Users API ingress. When installing the Secure Gateway Client locally with a classical installer there is no problem.

With everything in place — Secure Gateway Service with Client and Destination set up — the Users API is now available under a very cryptic URL, something like https://cap-eu-de-sg*****.securegateway.appdomain.cloud:12345.

In my next blog I will explain how to manage and describe the API to a developer using IBM API Connect, another service available on the IBM Cloud.

Blue Cloud Mirror – Of Kubes and Couches

In my last blog I presented an overview and introduction to Blue Cloud Mirror. In this blog I want to describe the back end of the Users API.

If a player of Blue Cloud Mirror decides to enter the competition and enters their user data, they are stored when the game is over and the player clicks “Save Score” on the Results page. Data is stored on premise (off the cloud) with the help of this Users API. The data set contains first name, last name, email, and the acceptance of the terms.

The Users API back end is made up of a Node.js application and CouchDB, both deployed on Minikube. You will find details here https://github.com/IBM/blue-cloud-mirror/tree/master/users

Our original plan was to use IBM Cloud Private (“eat your own cookies”) and I started to build a IBM Cloud Private instance but this is too big for a simple demo. There is an IBM Cloud Private Community Edition that everyone can download and use but its resource requirements exceed by far what is available on a typical notebook; no way to carry it around for a demo at a conference. You would need to have a server of a certain size that you can spare for the demo. Instead we decided to go with Minikube.

Minikube is a single node Kubernetes “cluster” that can run on a notebook. It is not suitable for production, of course, but it is sufficient to run this demo. Per default Minikube starts a cluster that uses 2 CPUs (or CPU threads depending on how you count them), 2 GB of RAM, and 20 GB of disk. If your notebook or server has more resources, you can utilize them. Other than that, setup of Minikube is really easy: download the Minikube executable and type “minikube start”. After 10 to 15 minutes you’ll have a Kubernetes cluster. All you need to do is enable ingress and that’s it.

There is a CouchDB container image on Docker Hub which I have used to create a simple deployment with a single pod. You need to persist the configuration and the data of CouchDB, information is available on Docker Hub. My deployment creates two persistent volumes of type HostPath and two persistent volume claims, one for the configuration and one for the data directory. Minikube provides a /data directory in the nodes file system that is persistent over reboots. This is why both persistent volumes point to the /data directory.

CouchDB starts up unconfigured in “Admin Party” mode. To be able to access CouchDB externally there is a NodePort definition for the CouchDB service, using port 32001. Once CouchDB is started, its admin dashboard (Fauxton) is available on this port. CouchDB configuration is described here.

The User Core Service is written in Node.js and provides an API to access CouchDB. It uses “express” for the POST and GET methods, “express-basic-auth” to allow only authenticated access to the API, and “nano” to access CouchDB. The CouchDB URL is passed as environment variable in the Kubernetes deployment, the URL must contain User ID and password of the CouchDB setup.

The API is exposed externally with a Kubernetes ingress. (Remember to enable ingress in Minikube!) The ingress is configured for TLS for a host name “users-api.cloud”. TLS uses a self signed certificate and the host name must be entered into the /etc/hosts file of the system running Minikube (unless you are the master of your DNS). Instructions are in the README. Using a self signed TLS certificate is no problem since it is used in only one place, the configuration of IBM Secure Gateway. Which I will explain in my next post. Stay tuned!